How to: A "DIY" GPS for mountain biking on the cheap
Why do you “need” a GPS for mountain biking?
You don’t really need a GPS to enjoy mountain biking, but it is definately one of the best accessories you could invest in and which will potentially enable you to make the most out of your rides. With a GPS, you will be able to better navigate trail networks, ride trails shared by other GPS-equipped mountain bikers (and also share your own), and increase your confidence in riding unfamiliar trails and going on longer, “exploration” rides. You can always follow distance- or landmark-based directions provided by guide books, online information or other riders (distance-based descriptions of trails can be figured out using your cycle computer), but a GPS will give you a bunch of other useful data (in addition to all those provided by a cycle computer): elevation profile, climbing rate, distance to waypoints, etc.
A GPS is also very important for safety on longer rides. I recently went on a 5-hour solo exploratoy ride to Wadi Hof, and at one point I completely lost my bearings. Of course I could easily figure out the general direction I should have been heading using the position of the Sun, but I simply couldn’t find a ridable trail in that direction after venturing south for much farther than I typically do. This can easily happen considering the nature of the terrain in Wadi Degla and Wadi Hof. What I did was simply backtrack my route into the ride using the track made on my GPS, which ultimately took me back to ridable terrain. It goes without saying that you should know the basics of navigation if you are serious about mountain biking, which can be done “traditionally” using maps and a compass, a GPS just makes it much easier.
There is a whole bunch of excellent GPS units for mountain bikers on the market, but this post is not about which ones you can buy, as this information is already readily available on the internet. Instead, what I will try to show is how to make a basic GPS navigation solution for mountain biking using stuff that you already have or can buy for cheap. Here is what you need:
1- A java-enabled cell phone (I am not an expert on cell phones but I know most good phones now have Java) How do you know if your phone has Java? Go here and see if its on the list. I have the Sony Ericsson K800i
2- A bluetooth GPS receiver: This is a simple GPS receiver, usually with no screen, that is meant to be used with another device (like a laptop or a cell phone). Prices vary according to model and features, but decent ones can be had for as low as $30-$40. I have the Q-starz BT-1000, which I reviewed on my blog a while ago.
3- A mounting bracket to mount the phone on your stem or handlebar (optional)
4- Navigation software: There is a whole bunch of those, free and commercial. For our purposes, I reccomend either Navigami or eGPSTrack. I prefer Navigami since its navigation screen has a mode where the display shows one large arrow pointing to a waypoint and the distance to that waypoint. Very useful for quick glances allowing on-the-move wayfinding and direction correction without having to stop and squint.
5- A PC with Google Earth installed or a list of waypoints for ride planning and waypoint marking.
Bear in mind that they key words for this solution is “simple and cheap“. Do not expect sophisticated navigational functions and mapping wizardry. But you don’t need an ultra high tech GPS for a Saturday morning ride anyway. For long distance epic rides, you should invest in a more sophisticated device.
Basically, what you need to do is:
1- Download the navigation software to your phone (this guide assumes you are using Navigami)
2- Pair up the bluetooth GPS reciever with your phone (usually done after starting up the navigation software)
3- Start entering waypoints into the application (I will not go into the details of that since it is application specific and pretty self-explanatory. In navigami, the waypoints will be listed under “landmarks”. You can create a route from a number of landmarks (waypoints). Give your waypoints descriptive names. You can get waypoints from Google Earth or a list that you might already have. Consult the documentation of your software of choice if clueless).
4- Go to Routes, select a route, select a landmark, then select Navigate
3- The screen should now display a large white arrow and distance to waypoint.
5- Mount your phone to your bike and go riding! (don’t forget the GPS reciever!).
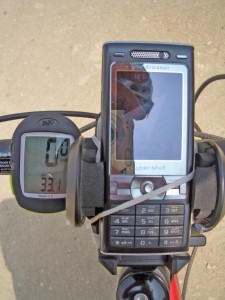
Sorry for the reflection in the picture, click for a larger view and you will see the main navigation screen. There is also a “Trip computer” screen that gives you a bunch of data like average and maximum speed, maximum elevation, total distance, etc, but is not very useful while riding becuase the font is too small, but that’s what my cyclocomputer is for anyway (the one in the picture is a Nite Rider Rebel 2.0). My mounting system was made using a cheap dashboard vent mount secured to the stem using cable ties and elastic string. It held the phone OK during rough trail rides. The GPS reciever is tucked away inside the “mp3 pocket” of my hyrdation pack.
